 |
|
|
 |
|
 |

This turned out to be quite an exciting build. Started off with a true JS23N0 70 Challenger R/T 383 4 speed car in FY1 Top Banana Yellow. Just the bare shell showing one repaint in its life, no engine, trans or interior. The owner decided to re-home a 440-6pak into it and keep the 4 speed of course. The oportunity to upgrade came along and it got some really cool improvements along the way. As with any car, what you see on the surface is only a small portion of what lies underneath, both good and bad. There was a little rust in the quarters that turned into replacing the quarter skins, trunk floor and tail light panel. The trunk lid was bent up just enough that it was replaced with a new piece. Roof had a few strategically placed dents that just would never look right, so the roof skin was replaced with a new one. Inner front fenders had enough extra holes and dents from abuse that it was easier to put new ones in. The shaker hood was new also, so a major portion of the car was wearing new metal at that point.
With the front fenders off and the new inner fenders in place, US Cartool front shock tower reinforcements were added for additional rigidity in the front end. Once the car was painted, laser cut form fitting subframe connectors and torque boxes were installed. Then, the whole underside was thoroughly undercoated. New factory gas tank with 1/2" pick up and stainless 1/2" fuel lines were installed along with stainless brake lines.
Note: You can get upgrades to your fuel lines from Right Stuff Detailing, like increasing the size from stock 5/16" to 3/8" or 1/2" and mild steel to stainless. Its an absolute bitch to get a 1/2" fuel line where a smaller line used to go, but you can do it. Stailess lines dont tend to kink when bent tight like mild steel will, but they also are a big pain to bend. Dont think your flare tool will flare stainless, because its wont. Especially a double flare for brake lines. Stailess lines will look new long after you are gone and its a cheap upgrade, but be prepared to cuss it at some point.
|
While the car is at the body shop, the gauges were sent off to Redline Gauges to be calibrated and re-faced. We opted for a new dash pad that uses a polycarbon framework rather than a steel one. Half the price and looks the same. Retro radio came with the stock appearing AM/FM radio that pumps out 140 watts of power to a pair of Diamond Audio 6x9's in the back shelf. New woodgrain dash faces, all the plastic edges and the heater control panel were available, so we got them along with the control cables. No need to worry if we should have done something to the dash or not.
As always on a total build like this, the K frame was blasted and painted after a skid plate was attached, and this served as a platform to start in on the driveline. Tubular upper control arms, factory lower control arms with stiffener plates, polygraphite bushings, adjustable strut rods from QA1 and a mongo-huge Helwig sway bar round out the front suspension. New front disc brakes (and rear) from Right Stuff Detailing finish it off before the motor goes on. |
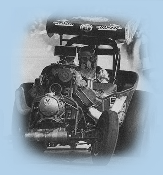
Originally was going to go with a 440-6 pack with a 4 speed and 8.75 rear end, but things upgraded along the way. A 472 cubic inch Hemi was built at Stanton Racing Engines, and upgraded with aluminum heads. It dynoed 590HP @ 5900RPM with a single 4 barrel. We added a Stage 5 intake and 2 Edelbrock carbs, and amped up the ignition system with a Streetfire controller from MSD. The Shaker baseplate had to be custom made for the new spacing of the larger carbs. The 8.75 rear end was upgraded to a Strange 60 rear end with 354 gears and disc brakes from DTS. The owner elected to have the optional leather interior and found a sweet deal on a set of Legendary covers ready to be installed. |
With the body back from the body shop (Advanced Autobody, Emporia KS), all you have to do is put it together. Sounds easy and quick when you say it in one sentence. First thing is to weld in the laser cut form fitting subframe connectors and torque box reinforcements, and undercoat it. Then you run all the stainless brake and fuel lines, prep the engine compartment, install the rear end with Caltrac suspension and add a huge adjustable Hellwig sway bar. Gas tank goes in next, then the engine/trans/front suspension. Now that its setting on 4 wheels again and can be moved, the entire interior and roof was insulated, wiring for the stereo and future upgrades was run, and dash installed. From there, all the glass goes back in new, along with all the new window trim. Front and rear T/A style spoilers go on, emblems, grille, tail lights and bumpers. The rest of the interior (carpets, headliner, package shelf and speakers, door panels, console and seats) goes in. |
|
|
 |
 |  |
|


")


