 |
|
|
 |
|
 |

This car may look familiar, as we sold it back around 2007 in rough project form. Six years later it was brought back to us pretty well the same way it was sold. The owner had a solid plan for exactly what he wanted it to be when it was done. Several years of research and planning went into this build and it paid off in the finished car.
It needed to be disassembled from a rolling body, to a completely stripped down shell, and sent to the body shop for a pair of quarters and minor dent removal, then painted to match the fender tag (color code L) 'Medium Dark Turquoise Metallic'. This is a very seldom seen color, as it was only offered in 1968. While the body was away, the work on the rest of the parts begins.
|
|
Once the car is back from the body shop, the car is put on a lift and the bottom of the car is steam cleaned. There is nothing under it at all, except for the rear end, to get in the way. This removes years of road grime and the recent shop grunge from being painted. After its good and dry, its wheeled to the 2 post lift, raised up and the rear end comes out. Paper is hung around the outside of the car along the bottom sides, wheel wells, and all around the edges, in preparation for undercoating. We use an industrial grade 3M undercoating for durability. In comparison, a new car dealer that undercoats a new car usually uses one can of a similar product--we use 6-7 of them. You start at the front and work your way back, then start over at the back and work your way forward, then go from side to side. This helps to cover all the small places missed when going only one direction. Then you wait a day and come back with 2 people to find the spots you missed.
The rear end is being rebuilt with the car is up getting undercoated. The stock 8-3/4" rear was fitted with a new DTS built 323 Auburn sure grip, axels are treated to a set of green bearings, and disc brakes are installed. A new set of springs is bolted on with polygraphite bushings and a set of gas charged shocks are installed.
While the rear end is being worked, the new stainless steel brake lines and fuel lines are put in. Once the rear end is back in place, the engine/trans/front suspension is installed. |
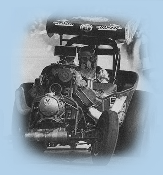
Engine is a date code correct 440 HP with forged pistons, fresh 906 heads, iron intake and Isky .465 lift/224 duration@.050 hydraulic cam. Carb is a Quickfuel HR-680-VS hotrod series vacuum secondary, with electric choke. Engine was built and dynoed in Nebraska, and shows Conservative 477 ft/lbs @ 3300, and 374HP@ 4700. These calculations were adjusted to sea level, as that's where the car will end up living. After driving it, those numbers may be a little light.
The front suspension and K frame were blasted and painted, front suspension was rebuilt using polygraphite bushings, and assembled giving the engine and trans a place to live till the car comes back from the body shop. Its also a good time to fit most of the bolt on accessories. Steering gear and pump were rebuilt at Steer & Gear, then fitted to the engine. Trans is date correct and completely rebuilt with a more firm shift that isn't harsh. Used a big converter out of a 4400 pound New Yorker to get just a bit more stall. For ease of adjustment and installation, a Lokar downshift cable was used. |
With the interior totally empty, the work here begins with the insulation process. A layer of closed cell foam with foil on one side and a white backing on the other is laid in from the windshield to the back glass. It is put in the roof panels also to help keep the heat out, before the headliner goes in. Then the headliner is installed. Before the dash goes in, a complete under dash air conditioning unit is installed from Classic auto air. While the car has been in the body shop, the dash frame was blasted and re-painted. The instrument cluster is sent away and all the gauges are calibrated and re-faced. An electronic movement reproduction style tic-toc-tac was installed for more accurate operation. New headlight and dash dimmer switches were installed, and a new cluster face topped it all off. The original AM radio was sent off and converted to a high power AM/FM with front and rear channels and an axillary port for an iPod. The dash wiring was all checked and main feed wires were replaced with heavier gauge wires. Steering column was rebuilt with new bearings and switches. Legendary Interiors supplied the headliner, carpets and door panels, and the A pillar and rear window moldings were replaced, as well as the arm rest bases and pads. Seats were hand stitched by Eddie at Evans Upholstery in Cottonwood Falls. All together, the interior is better than new. |
So far we have it back on 4 wheels. By the way, the wheels were built in our shop. Fronts are 15x7 Magnum 500's with P245/60-15 BF Goodrich radial T/A's, and the rear are 15x8's with P275/60-15's. Backspacing on the front is 4.25 and rears are 4.5". This tire and wheel combination works great on all 68-74 B bodies, and E bodies, as long as nothing has been changed as far as rear end width and spring location.
With the engine and trans in place, and the rear end in it, we can now install the rest of the exhaust. Got to have the bumper on it first so you know where the tips will need to end up. We used a complete 3" TTI system with X pipe and Dynomax mufflers. Everything come in the kit from the header gaskets to the stainless tips. Clamps and hangers are no doubt overkill due to their size and design, and will outlive anything else on the car. TTI uses aluminized heavy gauge pipe that is mandrel bent for smooth turns. It fits better than any kit ever made, and there are no changes needed to install it. Yes, it is expensive, but you only need to buy one of the other guys systems to learn the difference. We have installed these kits in cars that had different headers, and it took as much or more time to hook up the TTI system to the headers as it did to install the rest of the system. I cant stress enough that this is the best exhaust for your car, any way you look at it.
Now the driveshaft and gas tank go in. Beyond that, its a matter of hooking up some shift linkage and setting the ride height. |
Now that is back on the ground for a while, we put the finishing pieces in the engine compartment. A Hot Rod City Garage aluminum radiator with 2 rows of 1" cores, dual Spal fans mounted in an enclosed shroud is installed with a Derale dual fan controller. This controller turns one fan on at whatever temp you want it at, and the second fan comes on 10 degrees after that. They both come on at the same time when you turn on the a/c. A wiring harness is custom built for the engine compartment, as nearly everything is changed, and a bunch of stuff is added and deleted. Ignition is basically self contained, charging system is upgraded to a later model type with electronic regulator, and the ballast resistor is gone. Now its time to put in the battery, smoke test the wiring, and fire it up for the first time. |
|
|
 |
 |  |
|


")


